SharePoint: Record Changes at Field Level in A List Item
Out of the box SharePoint displays basic revision history on List Items, which looks a bit like this:
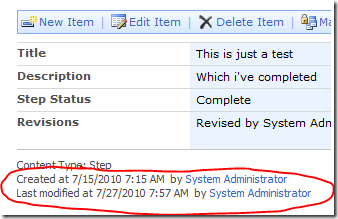
It tells you who created it along with who last modified it. Useful information but not always enough. Sometimes you want a full list of the names and dates of all revisions.
Sometimes you want to go further still and track changes in the value of a specific field too. The "status" field, let's say. This might look something like the image below, where the Revisions section of the Item lists all changes along with (if applicable) what the value of the Status field was before and after.
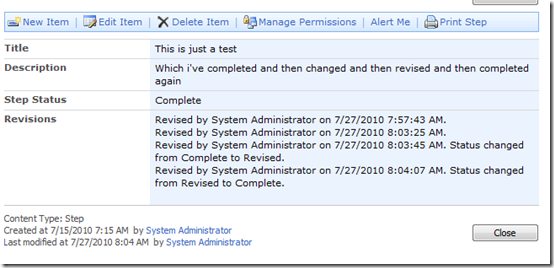
In most technologies this is quite a basic task. With SharePoint, unless I'm missing something, this was anything but simple.
What I'll describe here is how I went about adding the above Revisions section to a List Item.
Disclaimer: I'm not suggesting this is the only way or the best way to achieve this. I'm a noob at SharePoint and learning as I go. Feel free to use this approach or to point me in the right direction.
How?
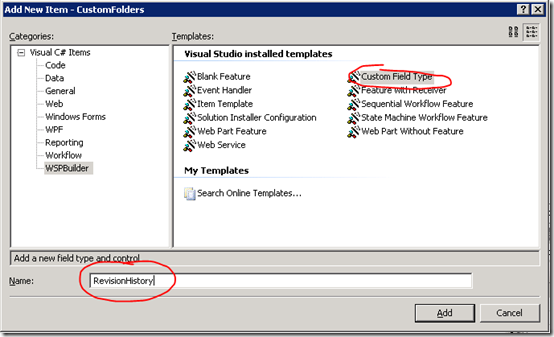
First thing we need is a new type of Field. From within a WSPBuilder project in Visual Studio add a new "Custom Field Type" as below:
After you click the Add button an XML file should appear. Make the changes highlighted below:
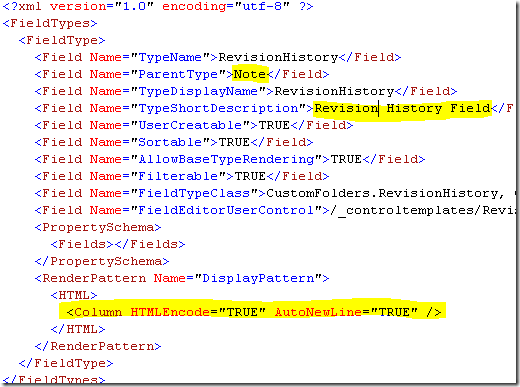
We changed the parent type of this field to "Note" which means it will act like a large multiline field with no restriction on text size.
Now, in the project structure there should be a folder called 12\template\controntemplates. The folder should have a file in it called RevisionHistoryFieldEditor.ascx. Edit this file to get rid of/replace (or hide) the example DropDown it contains. Once you're done, build the WPS package and deploy it, using the right click options of the WSPBuilder project.
Back in the SharePoint web site go to Site Settings and find the Content Type you want to add this field to. Open the Content Type and in the Columns section find the link to "Add from new site column". The page that follows lets you add a new Column and should list our new field type, as highlighted below:

Once you're done on that page you should see this new field on any Items based on the Content Type you added it to.
There you go - that's the easy part done!
Now we need to start logging the revisions to this field. To do this we'll use an Event Handler. Start by creating a new one, like so:
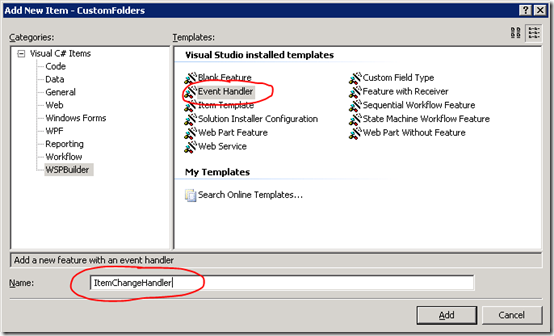
This will add a new folder containing the XML to describe this feature along with a folder containing the .CS file with the code for the handler.
In the newly-created XML file call elements.xml change it to look like this:
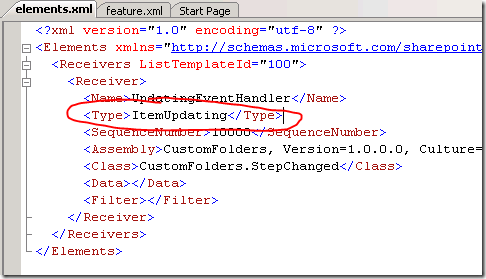
The handler now knows to only listed for events triggered by an item being updated.
Now, open the .CS file that shares the same name as the Event Handler you created. Find the ItemUpdating function and replace it with this code:
public override void ItemUpdating(SPItemEventProperties properties)
{
 try
 {

  SPList list = properties.OpenWeb().Lists[properties.ListId];
  SPListItem item = list.GetItemById(properties.ListItemId);

  if (item.Fields.ContainsField("StepStatus")){ //Must be the type of Item we're interested in!?

   string changeLog = "Revised by " + properties.UserDisplayName + " on " + DateTime.Now.ToString()+".";

   //BeforeProperties doesn't work for Lists! WTF!!
   if (properties.ListItem["StepStatus"[!=null && (properties.ListItem["StepStatus"].ToString() != properties.AfterProperties["StepStatus"].ToString()))
   {
    changeLog += " Status changed from " + properties.ListItem["StepStatus"].ToString() + " to " + properties.AfterProperties["StepStatus"].ToString() + ".";
   }

   properties.AfterProperties["StepRevision"] =
        ((item.Fields.ContainsField("Revisions"))?properties.ListItem["Revisions"]:"")
        + changeLog + "\n";
  }
 }
 catch (Exception e)
 {
  properties.ErrorMessage = e.StackTrace;
  properties.Status = SPEventReceiverStatus.CancelWithError;
  properties.Cancel = true;
 }
}
What this does is look for changes to the type of list Item we're interested in and then appends a change log to the field with the name by which we called the field we added earlier.
With the code in place you need to build the WSP project, deploy it and then enable the new feature in the site admin area.
Summary
Believe it or not I've made this sound easier than it actually is! In reality it's a bit trickier as you need to deploy, build and debug the feature. However, what I've outlined above is what I believe to be a half decent solution to this problem. Whether there's a better one I don't know. Trust me when I say I had a good hard look for one before I started down the DIY route.
Just never try to change that Custom Field Definition later, and redeploy it.
Reply
Jake, I believe you are going to find the DIY approach is the common approach unless you find an existing web part someone else has created. The .NET framework, from what I have seen, does so much thinking for the developer that two issues arise. Firstly, development can be achieved with little thought if little customization is desired. Secondly, anything that the SharePoint.NET core team has not thought of is going to be inherently a lot of work by comparison because you have to build up the piece of the framework you find lacking from the .NET level up.
Understanding that SharePoint is essentially an ASP.NET extension (a framework upon a framework) helps us realize this should be no surprise. It's looking to me like I go out and buy a simple two door car and realize a month in that I need a third door and then have a lot of sheet metal work ahead of me to get one (because I'm apparently damned if I think I can take the car back.) The recurring theme is that SharePoint is gorgeous out of the box but is what it is and not much more. The "much more" is all on the back of the developer, or so it would seem.
Reply
Simplified way that uses OOTB SharePoint:
Use a "Multiple lines of text" column type with "Append" on. Then in SharePoint Designer create a "Run when items updated" workflow on the list to add an "entry" to the Revisions field. You can then use SPD to customise the New and Edit forms so that the Revisions field is read-only.
A major drawback with this method is that SPD workflows can only be attached to specific lists (as opposed to Browser-based workflows that can be attached to content types) so if you have multiple lists you'll need to duplicate the workflow for each list (in which case your way would be better).
Reply
Wait til you try to reproduce controlled access sections !
Reply
Turning on Version History will keep a record of every change.
To see what was previously done, select the Item and select Version History.
It doesn't fill up the Item either
i.e. if 50 changes were made in the example above, your Item window would grow quite large.
Reply